Using Quizzes and Other Interactive Assets in Your Fashion Courses

One of the key roles we play in teaching students our fashion subjects is to ensure we engage them throughout our courses AND that we have ways to assess what they have learned. Using interactive elements allows us to achieve both.
When you publish your online fashion course on The Fashion Student Hub, you can use interactive elements from a library of Open Source resources available at H5P.org. The content from H5P allows you to create rich and engaging content for your courses for free.
I've summarised them below, and later in the post, I'll explain how to add them to your own course or website.
Summary of Interactive Course Assets
If you want to see any of these in action, then please go to the H5P.org website; here is the link.
Remember that you should only choose to use an asset and add it to your course if it will add value either in improving the overall student experience or it helps achieve a learning objective. In other words, avoid using them just for the novelty factor. It can be really tempting to add a resource just because it looks cool or fun, but it has to serve some value to the student.
| Accordion - Reduce the amount of text presented to readers by using this responsive accordion. Readers decide which headlines to take a closer look at by expanding the title. Excellent for providing an overview with optional in-depth explanations. | |
| Agamotto - Allows users to compare and explore a sequence of images interactively. Authors can decide to add a short explanatory text for each image. | |
| Arithmetic Quizzes - This content type generates random arithmetic quizzes in a flash. As an author, all you have to do is decide the type and length of the quiz. Users keep track of score and time spent when solving the quiz. | |
| Audio Recorder - Audio Recorder allows you or your students to record a voice message and play it back immediately or download a .wav file for future use. A fitting content type for open-ended questions and language courses or where you want to give feedback verbally. | |
| Chart - Create pie charts and bar charts quickly and effortlessly into your lessons. | |
| Collage - This allows you to add images to your lessons and build them as a collage so that students have an interesting way to view them. | |
| Column - You can add various interactive elements that you see described on this page as a column. This gives you the chance of having multiple quizzes and other elements on one page. | |
| Course Presentation - Course presentations consist of slides with multimedia, text, and many different interactions like interactive summaries, multiple-choice questions, and interactive videos. Learners can experience new interactive learning material and test their knowledge and memory in Course Presentations. | |
| Dialogue Cards - These are used as a drill to help learners memorize words, expressions or sentences. On the front of the card, there's a hint for a word or expression. By turning the card, the learner reveals a corresponding word or expression. | |
| Documentation Tool - The documentation tool aims to make it easy to create assessment wizards for goal-driven activities. It can also be used as a form wizard.
While editing, the author can add multiple steps to the wizard. In each step, the author can define which content goes into that step. Content can be plain text, input fields, goal definition and goal assessment. Once published, the end-user will be taken through the steps of the wizard. On the last step of the wizard, the user can generate a document with all the input that has been submitted. This document can be downloaded. |
|
| Drag and Drop - enables the learner to associate two or more elements and make logical connections visually. Create Drag and drop questions using both text and images as draggable alternatives. H5P Drag and drop questions support one-to-one, one-to-many, many-to-one and many-to-many. | |
| Drag the Words - allows content designers to create textual expressions with missing pieces of text. The end-user drags a missing piece of text to its correct place to form a complete expression.
It may be used to check if the user remembers a text she has read or understands something. Helps the user think through a text. |
|
 |
Essay - Allows students to receive instant feedback on a text that they have composed. Authors can define a set of keywords that will trigger individual responses if they are found or missing in the text. |
| Fill in the Blanks - Create pie charts and bar charts quickly and effortlessly into your lessons. | |
 |
Multiple Hot Spots - This content type can be used for questions where the student, for instance, are asked to find all the hotspots in an image. They are provided with relevant feedback based on where they click. |
| Find the Hot Spot - Allows students to press somewhere on an image and get feedback on whether that was correct or incorrect according to the task description. | |
| FlashCards - This lets you create a single flashcard or a set of flashcards that have both questions and answers. Learners are required to fill in the text field and then check the correctness of their solution. | |
| Guess the Answer - This allows you to upload an image and add a suitable description. End users can guess the answer and press the bar below the image to reveal the correct answer. | |
| Image Hot Spots - Image hotspots make it possible to create an image with interactive hotspots. When the user presses a hotspot, a popup containing a header and text or video is displayed. | |
 |
Image Juxtaposition - Allows users to compare two images interactively. |
 |
Image Sequence - This allows you to add a sequence of your own images (and optional image description) to the game in a particular order. The images' order will be randomized, and students will have to reorder them based on the task description. |
 |
Image Slider - Appealingly present your images with ease. Just upload images and provide alternative texts for the images. |
| Interactive Videos - Videos may be enriched with interactivities like explanations, extra pictures, tables, Fill in the Blank and multiple-choice questions. Quiz questions support adaptivity, meaning that you can jump to another part of the video based on the user's input. Interactive summaries can be added at the end of the video. Interactive videos are created and edited using the H5P authoring tool in a standard web browser. | |
| Mark the Words - Allows you to create textual expressions with a defined set of correct words. The end-user highlights words according to the task description and is given a score. | |
| Memory Game - Add your own images (and optional text) to a memory game. Students search for image pairs to play the game, which will display a specified text message once a matching pair has been found. | |
| Multiple Choice - Create vertically stacked expandable items. | |
| Personality Quiz - Define a series of questions with alternatives, where each alternative is matched against one or more personalities. At the end of the quiz, the end-user will see which personality matches the best. There are several ways of making this quiz visually appealing, e.g. representing questions, alternatives, and personalities using images. | |
| Questionnaire - This allows you to create questionnaires to be used as surveys or open-ended questions. You may use multiple choice questions or text input questions. | |
| Quiz - This allows the learner to solve a sequence of various question types. You can combine many different question types like Multichoice, Drag and drop and Fill in the blanks in a Question set. As a tutor, there are many settings you can use to make it behave just the way you want it to. You may, for instance, customize the Question set with background images and define a pass percentage for the learner.
The Question Set also allows you to add videos that are played at the end. One video for success, another if the learner fails the test. This might motivate learners to try again if they fail so that they get to see the success video. |
|
| Single Choice Questions - Single choice set allows tutors to create question sets with one correct answering alternative per question in just a few seconds. The end-user gets immediate feedback after submitting each answer.
|
|
 |
Speak the Words - A voice recognition content type allowing authors to ask questions that should be answered with the student's own voice. |
| Summary - Summaries help the learner remember key information in a text, video or presentation, by actively building a summary about the topic at hand. When the learner has completed a summary, a complete list of key statements about the topic results. | |
| Time Lines - This allows you to place a sequence of events in chronological order. For each event, you may add images and texts. You may also include assets from Twitter, YouTube, Flickr, Vimeo, Google Maps and SoundCloud. | |
 |
True/False Question - Create simple true/false questions based on statements you provide. |
How to Add These to a Course
First, you can add these to any course hosting platform or your own website, providing the platform allows you to embed items. Embedding means that you are taking a short piece of code and pasting it into your course area. The student's browser to follow your online fashion course is then checking that code and displays the resource based on that code.
The code is provided to you by H5P from the resource you are using. It looks something like this:
<iframe src="https://h5p.org/h5p/embed/109562" width="1091" height="193" frameborder="0" allowfullscreen="allowfullscreen"></iframe><script src="https://h5p.org/sites/all/modules/h5p/library/js/h5p-resizer.js" charset="UTF-8"></script>
That particular code creates this:
You copy the code and then paste it into your course. If you are hosting your course on The Fashion Student Hub, you provide us with this code when you provide your other course assets. It's as easy as emailing us the code and telling us which lesson it goes in. We'll do the rest.
Setting Up Your Interactive Resources
To use any of these resources, you'll need to follow these steps:
- Got to H5P.org and set up a free account.
- Log in to your account and then visit the Examples and Downloads page of their site to see all the various types of resources. These will be the same as the ones above. Here's the link to that page.
- There are lots of tutorials on the site that explain the settings possible for each resource. They are fairly intuitive but refer to the guides if you get stuck.
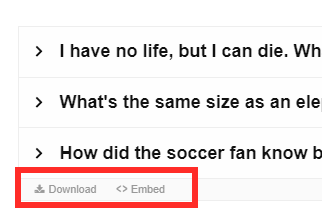
- Once you have completed the settings for your resource, you need to get the embed code. This can be found at the bottom of the resource via a link. When you save a resource after working on it, it defaults to showing you the finished item as if a student were going to use it. You will see two links at the bottom of the resource, one for Download and one for Embed.

- Next, click on the Embed link and then copy the code that you see appear. That's the code you need to then paste into your lesson.

- Then go back into Edit mode for the resource. Scroll to the bottom of the resource and uncheck the display button options so that when your students view your resource, it will not display the Download and Embed links. If you need to capture the code again, you'll need to switch these back on again before you save the resource so that you can see the Embed link again and copy the code.
- Then with the copied code, paste it into your lesson on whatever hosting platform you are using. Or let us have it, and we'll place it in the correct lesson for your course if you are hosting it on The Fashion Student Hub.
That's it. Beautiful engaging and interactive course resources that you can add to any of your online fashion courses.
Join over 1 million people making a living with online courses!
Sign up to get more information about how to teach online, how to pivot your lectures to include online sessions and how to coach students online using the latest technologies.
Get our free training today.
We hate SPAM. We will never sell your information, for any reason.


